
Save on time and charging costs by refueling electric fleet vehicles at driver homes.
Getting Started
In this guide, Fleet Managers will find all the information required to start charging electric fleet vehicles with EV-enabled fleet cards.
For an optimal experience, please ensure that you are using the latest version of your internet browser. Google Chrome is recommended.
Download these onboarding instructions here.
Finding Chargers in the WEX Network
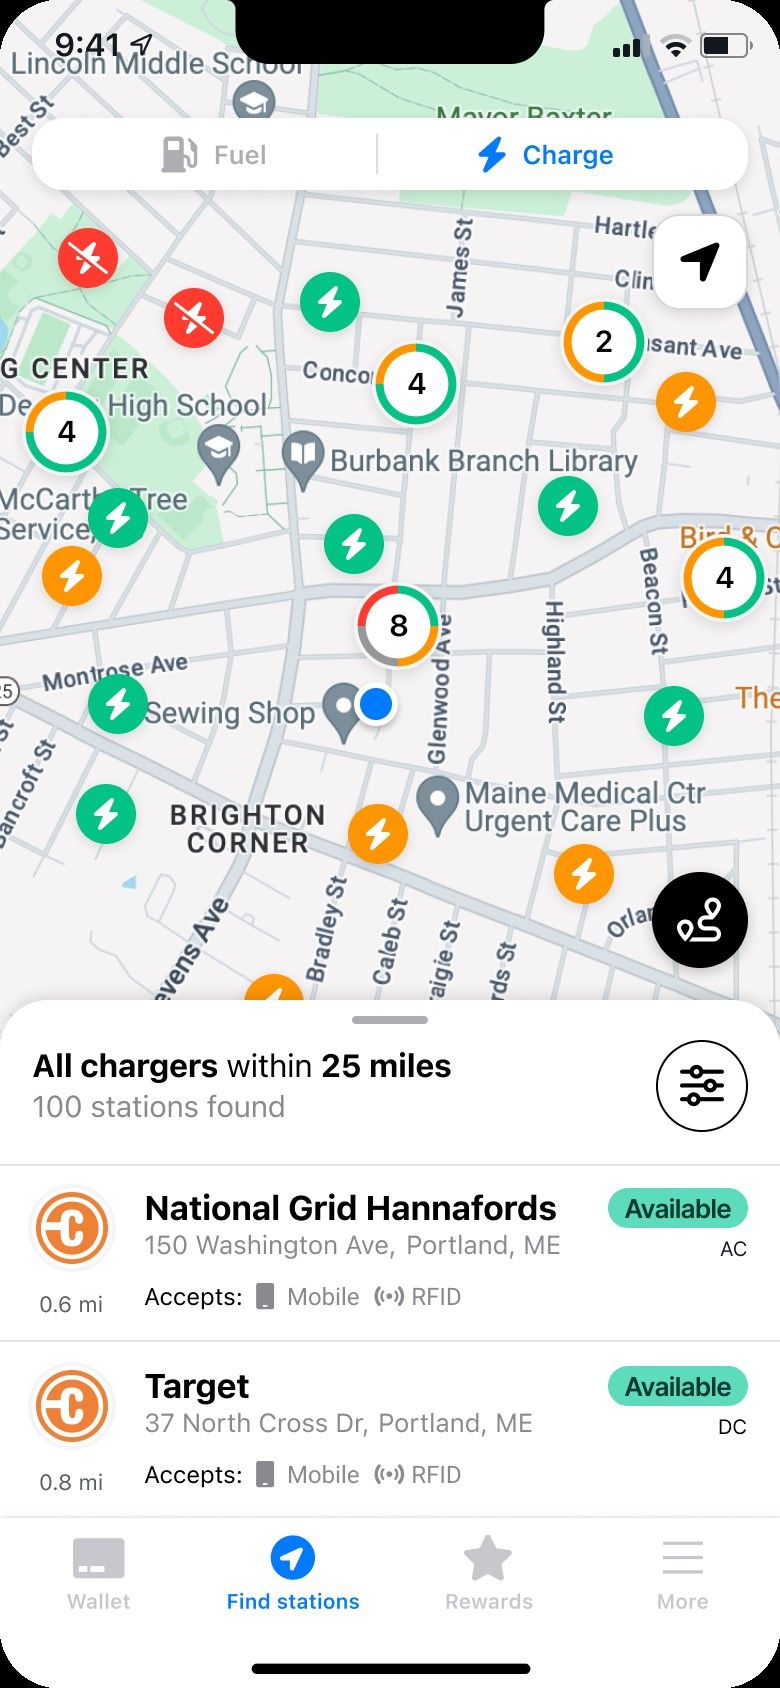
Drivers can charge an electric vehicle en route at WEX accepting charging stations. These stations can be located using the DriverDash or WEX Connect apps.
The app will display all available charging locations. Users can use filters to narrow search criteria by charge point operator (CPO), connector type, and more.
Equipping Drivers with EV-Enabled Cards
After EV has been enabled at the account level, the Fleet Manager must either enable existing fleet cards for EV charging, or order new EV-enabled cards.
Enabling Existing Cards for EV Charging
Enable existing cards associated with existing fleet vehicles that need EV-charging capabilities.
When card enablement is complete, WEX will send one WEX Fleet card with EV payment capabilities to Fleet Managers to distribute when applicable.
As soon as a card has been enabled, drivers may download the DriverDash app to initiate charging sessions.
- Log into your online portal
- Click the “Cards” tab in the navigation pane on the left
- Click “View cards”
- Locate any card which must be enabled for EV charging
- Use the “Advanced Search Filter” dropdown for faster searching
- Select the correct card, then click “Select” under “Actions”
- Click “Enable EV”
- Enter vehicle VIN
- Fields marked with an “*” are required
- Click “Save”
- Repeat the process to enable more cards as needed
Ordering New, EV-enabled Cards
Order new cards for vehicles previously unequipped with fleet cards that also need EV-charging capabilities.
When card enablement is complete, WEX will send one RFID per newly EV-enabled fleet card to Fleet Managers to distribute when applicable.
As soon as a card has been enabled, drivers may download the DriverDash app to initiate charging sessions. If accounts are using RFIDs, drivers may also use a WEX-provided RFID to begin a charging session after the RFID arrives in the mail.
- Log into your online portal
- Select “Cards” from the left navigation pane
- Select “Add vehicle/asset card”
- Click to toggle “EV Enabled” button on (blue)
- Enter information
- Fields marked with an “*” are required
- Click “Save”
- To add another driver, click “Add Another” and repeat steps 4-6
- Click “Complete Order”
- Click the dropdown to select the preferred shipping option
- Click to select preferred address type
- If “One time use” is selected, enter required address information as noted with “*”
- Confirm that “Contact” and “Address” information are correct
- Click “Finish”
Authorizing More Than 3 Daily Charges
How to Change the Transactions Per Day Limit in your online portal
Authorization profiles allow Fleet Managers to limit the number of daily transactions, maximum daily spend, and more.
In your online portal, the default limit on daily transactions is 3. Some Fleet Managers may prefer to allow additional daily charging sessions and should follow these steps to do so.
- Log into your online portal
- Click “Cards”
- Click “Add Authorization Profile”
- No changes are required to change the Transactions Per Day Limit on page 1, “Get Started”
- Make any desired changes
- Note that electric vehicle charging is included under “Fuel”
- Click “Next”
- No changes are required to change the Transactions Per Day Limit on page 2, “Per Transaction”
- Make any desired changes
- Click “Next”
- If drivers should have no limit on transactions per day, click the “No” button across from “Would you like to limit purchases daily?”
- To limit Dollars Per Day, enter the desired limit under “Dollars Per Day,” “Set Limit”
- To limit Transactions Per Day, enter the desired limit under “Transactions Per Day,” “Set Limit”
- Click “Next”
- No changes are required to change the Transactions Per Day Limit on page 4, “Weekly Schedule”
- Make any desired changes
- Click “Next”
- Set a Authorization Profile Name that is easy to remember, such as “EV # daily transactions”
- Click “Finish”
- New Authorization profiles must be assigned to drivers by following instructions in the following section, “Changing Driver Authorization Profiles”
Changing Driver Authorization Profiles
- Log into your online portal
- Click “Cards”
- Click “View cards”
- Locate the first driver whose authorization profile needs to be changed
- Use the “Advanced Search Filter” dropdown for faster searching
- Driver status must be “Yes” in the “EV Enabled” column
- Under “Actions” click “Select” on the corresponding line of any selected driver
- Click “Change Auth Profile”
- Select the new authorization profile from the “Available Profiles” dropdown
- Click “Apply”
- Repeat steps as needed
About DriverDash
Fleets have the option to equip drivers with the DriverDash application if drivers use mobile devices (iPhone, Android, etc) for business use. DriverDash can be used to start and/or stop charging sessions remotely from a mobile device.
DriverDash is available both on the Apple Store and Google Play.
If the fleet is not currently using DriverDash, please reach out to your dedicated WEX contact or contact WEXEVFleet@wexinc.com to learn more.
Inviting Drivers to Use and Download DriverDash
To use DriverDash, Fleet Managers must use your online portal to invite drivers to download the app and set up an account.
- Log into your online portal
- Make sure that all new drivers have been added before starting
- Click “Cards” in the navigation pane on the left
- Click “View drivers”
- Locate the first driver who needs to be invited to DriverDash
- Use the “Advanced Search Filter” dropdown for faster searching
- Once the correct driver has been located, click “Select” under “Actions”
- Click “Add DriverDash Access”
- Fill in the driver email address and phone number
- Fields marked with an “*” are required
- Click “Submit”
- Repeat as needed to invite all drivers who need DriverDash access
- The link sent to drivers via email will only be active for 24 hours. If the link expires, the Fleet Manager will need to send the link again by following the steps in the following section, “Resending the DriverDash Invite to Drivers”
Resending the DriverDash Invite to Drivers
- Log into your online portal
- Click “Cards” in the navigation pane on the left
- Click “View drivers”
- Drivers who have not yet created an account will be noted as “Pending” in the DriverDash Access column
- Use the “Advanced Search Filter” dropdown for faster searching
- Once the correct driver has been located, click “Select” under “Actions”
- Click “Resend DriverDash Link”
- Repeat steps 4-6 as needed
Starting a Charging Session with DriverDash
- Open the DriverDash app and log in
- Tap “Activate station”
- Tap to choose a charging station
- Input vehicle odometer reading
- Input vehicle ID
- When prompted in the app, plug the connector into the vehicle to start charging. The DriverDash screen will change when the vehicle is charging successfully
- Allow the vehicle to charge as needed
- The DriverDash app may be closed while a vehicle is charging without causing any interruptions to charging. Reopen the app and tap “Vehicle is charging…” to return to the charging screen
- When ready to disconnect, tap “Finish charging” in the DriverDash app, or disconnect the charger and return it to the charging station dock
- Charger will continue to be active until the connector has been disconnected from the vehicle
- After each charging session is complete, the driver will receive a digital receipt. This receipt will be stored in the DriverDash app. The Fleet Manager will be able to review these receipts in your online portal within a few minutes of charging session completion
Removing Driver Access to DriverDash
- Log into your online portal
- Click “Cards” in the navigation pane on the left
- Click “View cards”
- Locate drivers whose access should be removed
- Use the “Advanced Search Filter” dropdown for faster searching
- Drivers who have not yet created an account will be noted as “Pending” in the DriverDash Access column
- Once the correct driver has been located, click “Select” under “Actions”
- Access can be removed for drivers whose status is “Yes” or “Pending”
- Click “Remove DriverDash Access”
- Repeat steps as needed
Getting Started
In this guide, drivers will find all the information required to start charging an electric vehicle en route.
For an optimal experience in this onboarding, please ensure that you are using the latest version of your internet browser. Google Chrome is recommended.
Download these onboarding instructions here.
Finding Chargers in the WEX Network
Drivers can charge an electric vehicle en route at WEX accepting charging stations. These stations can be located using the DriverDash or WEX Connect apps.
The app will display all available charging locations. Users can use filters to narrow search criteria by charge point operator (CPO), connector type, and more.
Setting up WEX Connect for Fleet Charging
WEX Connect is a free app open to all users with no account required. Use WEX Connect to find charging stations and more.
- Tap the app from the home screen
- Tap “More”
- Tap “Fleet codes”
- Enter fleet code: WEXEV
- Tap “Charge” to find chargers in the WEX network
After Receiving a Fleet Card
To begin an electric vehicle charging session, drivers need a WEX Fleet card with EV payment capabilities or the DriverDash app to activate a charging station.
Downloading the DriverDash App
If you receive an email instructing you to download the DriverDash app, please do so on the mobile device approved for company use as soon as possible. The link will only work for 24 hours after the email has been received. If the link expires, ask the fleet manager to resend.
DriverDash is available on both the App Store for Apple devices and Google Play for Android devices.
Setting Up DriverDash as an Existing User
- Ensure that the driver’s mobile device has the most recent version of the DriverDash app
- Tap “Next”
- Enter the email address associated with the driver’s account
- Tap “Next”
- Check the driver’s email for the link to reset the password
- Enter the driver’s username and password
- Tap “Log in”
- Tap to choose preferred method of authentication
- Enter phone mobile number
- Tap to confirm
- Enter the code
- Tap “Verify”
- Continue to onboarding section “Adding a Fuel Card in DriverDash”
Setting Up DriverDash as a New User
- Drivers will receive email prompting DriverDash download in their company email address. Driver should open this email in the company mobile device
- Driver should download the DriverDash app if they have not already done so
- DriverDash is available on both the App Store and Google Play
- From email, tap unique link to begin using DriverDash
- Do not forward email to other drivers
- Link only valid for 24 hours after email delivery. If 24 hours have passed, please request a new email from the Fleet Manager
- Enter a custom Username
- Tap “Next”
- Create a secure password
- Tap “Next”
- Open the DriverDash app
- Enter login credentials
- Tap “Log in”
- Tap to choose the driver’s preferred authentication method
- Enter the driver’s mobile phone number
- Ensure that the mobile device has service to receive a call or text
- Enter the 6-digit security code. For security purposes, never share this code with anyone.
- Tap “Verify”
- Tap “Continue”
- Tap “OK”
- Tap “Allow”
- Tap “Setup rewards”
- Continue to section: Adding a Fuel Card in DriverDash
Adding a Fuel Card in DriverDash
- Open the DriverDash app
- Tap “Add Card”
- Tap “Enter manually”
- Enter 18-digit card number as shown in the app
Locating WEX-accepting Charging Sites in DriverDash
- Open the DriverDash app
- Confirm that an EV-enabled fleet card is set up in the account to unlock full app functionality
- Tap “Find Stations” on the bottom of the screen
- To find EV chargers, tap “Charge” on the top of the screen
Starting a Charging Session in DriverDash
- Open the DriverDash app and log in
- Tap “Activate station”
- Tap to choose a charging station
- Input vehicle odometer reading
- Input vehicle ID
- When prompted in the app, plug the connector into the vehicle to start charging. DriverDash screen will change when the vehicle is charging successfully
- Allow the vehicle to charge as needed
- The DriverDash app may be closed while a vehicle is charging without causing any interruptions to charging. Reopen the app and tap “Vehicle is charging…” to return to the charging screen
- When ready to disconnect, tap “Finish charging” in the DriverDash app, or disconnect the charger and return it to the charging station dock
- Charger will continue to be active until the connector has been disconnected from the vehicle
- After each charging session is complete, the driver will receive a digital receipt. This receipt will be stored in the DriverDash app. The Fleet Manager will be able to review these receipts in your online portal within a few minutes of charging session completion
Getting Started
- To enable WEX EV home reimbursement, your fleet account must first be enabled for EV by a WEX sales contact.
- Fleet Managers must then enable individual fleet cards for EV prior to adding home charging. See instructions below if needed.
- Fleet Managers must manage home reimbursement in your online portal and drivers must use DriverDash to participate in WEX home charging.
Enabling Existing Cards for EV Charging
Enable existing cards for drivers who already have a fleet card and need EV-charging capabilities.
When card enablement is complete, WEX may send one RFID per newly EV-enabled fleet card to Fleet Managers to distribute where applicable.
- Log into your online portal
- Click the “Cards” tab in the navigation pane on the left
- Click “View cards”
- Locate the first card which must be enabled for EV charging
- Use the “Advanced Search Filter” dropdown for faster searching
- Select the correct card, then click “Select” under “Actions”
- Click “Enable EV”
- Enter driver email, driver phone number, and vehicle VIN
- Fields marked with an “*” are required
- Click “Save”
- Repeat the process to enable more cards as needed
Ordering New, EV-enabled Cards
Order new cards for drivers previously unequipped with fleet cards.
When a card order is submitted, WEX may also send one RFID per new EV-enabled fleet card for Fleet Managers to distribute where applicable.
- Log into your online portal
- Select “Cards” from the left navigation pane
- Select “Add _____* card”
- * This term may vary by account type
- If the driver should have DriverDash access, click to toggle “DriverDash Access” button on (blue). This will trigger an email prompting the driver to download DriverDash and set up their account via a link that will expire after 24 hours
- Click to toggle “EV Enabled” button on (blue)
- Enter information
- Fields marked with an “*” are required
- Click “Save”
- To add another driver, click “Add Another” and repeat steps 4-7
- Click “Complete Order”
- Click the dropdown to select the preferred shipping option
- Click to select preferred address type
- If “One time use” is selected, enter required address information as noted with “*”
- Confirm that “Contact” and “Address” information are correct
- Click “Finish”
Requesting Home Reimbursement for Drivers
- Log into your online portal
- In the left navigation panel, click “Cards”
- Click “View Drivers”
- Locate the driver you would like to enable for home reimbursement and click “Select”
- Ensure that the “Enable DriverDash” button is on
- Select “Request home reimbursement”
Setting a Driver’s Home Reimbursement Rate
After a driver has completed their onboarding, fleet managers must set the reimbursement rate. There are two reimbursement rate options:
- Flat rate. A custom rate that will not respond to utility cost fluctuations. Must be between $0.08-$0.80 per Kilowatt-hour (kWh).
- Utility rate. A rate based on each driver’s local utility. Like utility rates, this rate will fluctuate.
Follow these steps:
- Log in to your online portal
- In the left navigation panel, click “EV”
- Click “View Home Reimbursements”
- Click “Setup”
- Click the desired driver (Note that reimbursement rates can only be set for drivers whose status is “Ready For Approval.” If a driver has not completed onboarding, they will still be in “Requested” status)
- Click “Activate”
- Enter the driver’s reimbursement rate in the corresponding field.
- Click “Activate”
Changing a Driver’s Home Reimbursement Rate
- Log into your online portal
- In the left navigation panel, click “EV”
- Click “View Home Reimbursements”
- Click “Setup”
- Find the driver you want to edit
- Click the three vertical dots that correspond to this driver
- Click “Edit rate”
- Enter the new rate
- Click “Save”
- Repeat as needed for additional drivers
Managing Home Reimbursement Charges
When a driver charges a company EV on a home charging station, the transactions appear on the fleet manager’s online portal dashboard. The Fleet Manager can approve or deny reimbursement for each transaction. Note: Fleet Manager must approve reimbursements in order for the driver to be paid.
- Log into your online portal
- On the home page, click the blue notifications banner
- Click “You have __ open reimbursement(s)”
- Review any transactions marked “Pending” in the “Status” column
- Click on the reimbursement to approve
Driver Reimbursement Experience
Drivers will receive approved reimbursements via their account in the PayControl app. Drivers will be able to see the status of their home reimbursements in the “More” tab in the DriverDash mobile app.
Requesting New Home Chargers
- Log into your online portal.
- In the left navigation panel, click “EV”
- Under your business name, click “View Account Details”
- In the “Request Home Chargers” section, click “Request”
- Find the correct driver
- Click the “Select” dropdown that corresponds to the correct driver
- Click “Request Home Charger”
- Enter the required information
- Click “Submit”
After a request is submitted, a ChargePoint representative will contact the driver to assess the site for eligibility and installation.
Getting Started
For an optimal experience, please ensure that you are using the latest version of your internet browser. Google Chrome is recommended.
Download these onboarding instructions here.
Please note that all drivers must be entered into WEX Online to receive home charger installation.
Requesting a Charger in WEX Online
- Log into WEX Online
- Click the “Administration” tab in the navigation pane
- Click “View account details”
- Locate the “Request home chargers” section and click “Request”
- Select how you would like to pay for your home charger by clicking “Pay with WEX credit line” or “Use alternate payment method”
- Continue to the next section as applicable
Paying for Home Chargers with WEX Credit Line
- Click “Pay with WEX credit line”
- Click “Continue”
- Enter the number of chargers that you need to be delivered at ONE location
- One order must be placed per delivery location
- If you do not need help with installation, click the “No” button
- If you do need help with installation, enter the name of drivers who must be equipped with home chargers to be delivered at ONE location
- Note: the total number of drivers requiring installation must match the total number of chargers
- Click “Submit”
- Repeat process as needed
Paying for Home Chargers with Alternate Payment Method
If you would like to purchase chargers directly from ChargePoint, follow the below steps to be referred to ChargePoint for further support.
After completing the steps in section: Requesting a charger in WEX Online.
- Click “Use alternate payment method”
- Click “Continue”
- Enter your driver’s information into all fields
- Click “Submit”
- Repeat process as needed
Finalizing Your Order(s)
After home chargers have been ordered with or without installation, a WEX sales representative will reach out to finalize the details of the orders. Fleet Managers will have an opportunity to review and approve all order details prior to submission.
Charger Delivery
Home chargers will be shipped and delivered to each driver’s home or a fleet warehouse.
Charger Installation
When installation is requested, Qmerit will contact the fleet manager and driver(s) to coordinate installation. Qmerit will send an installation survey to the driver to provide an initial quote for the installation and fleet managers will have the opportunity to approve or reject these quotes.
Payment
Chargers paid for with WEX line of credit will appear as line items on your regularWEX invoice, including sales tax (where applicable), shipping fees, and installation costs, if desired.
Using Home Chargers
After chargers have been installed, fleets can sign up for the WEX home reimbursement solution to reimburse drivers for home charging expenses.
Getting Started
For an optimal experience in this onboarding, please ensure that you are using the latest version of your internet browser. Google Chrome is recommended.
Add Depot Chargers
Connect to Charge Point Operators
Fleet managers may link their WEX account to Charge Point Operators (CPOs) via technical or manual integration. Technical integration is recommended for maximum security and data reliability.
Technical Integration
With Managed CPO Brand
Blink
Please contact your Blink account representative and ask that your private depot chargers be enabled for WEX use.
ChargePoint
Generate a ChargePoint Connection Code
First, users must either generate their ChargePoint connection code, or retrieve your existing connection code. To do either, begin by logging into your ChargePoint admin account.
If you are not the ChargePoint administrator for your fleet, please contact your fleet administrator for assistance. This could be a local facilities manager, or other role within your organization.
If you are unable to determine your organization’s ChargePoint fleet administrator, please reach out to the support email address associated with your charging stations (that is not ChargePoint) for assistance. The Station Info listing can also tell you who owns the charger.
If your organization has already generated a ChargePoint connection code, continue to section Retrieve Your ChargePoint Connection Code with the party who has access to this account.
- From the ChargePoint Dashboard, click the Drivers tab
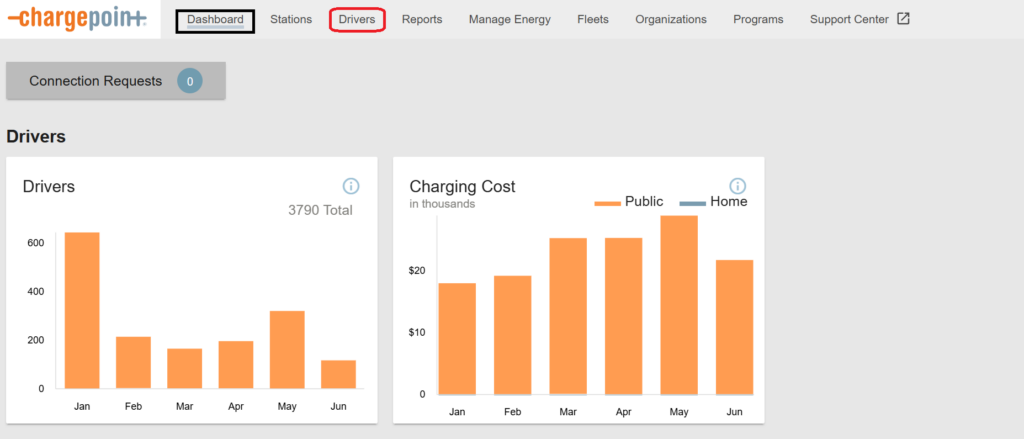
- Click the Connections sub-tab

- Click New Connection on the left at the top of the table (shown above)
- Input information in all required fields as follows in the table below
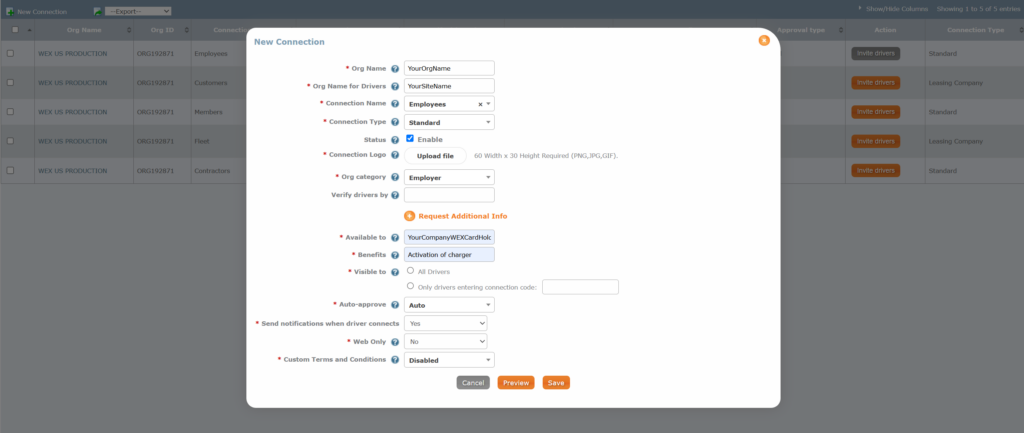
Field Input Org Name The official name of your organization as entered into ChargePoint (as entered in section 3.1., step 5) Org Name for Drivers YourOrgName WEX Drivers (e.g. Acme WEX Drivers) Connection Name Click Employees from the dropdown (even if inaccurate) Connection Type Click Standard from the dropdown Status Click Enable from the dropdown Connection Logo Required file that is not used. Upload any logo or any blank image Org Category Click Employer from the dropdown Verify Drivers by Enter: driverId Available to YourOrgName WEX Drivers, same as Org Name for Drivers Benefits Charger activation and mapping Visible to Click radio button: Only drivers entering connection code, and enter code: YourOrgNameWEX (e.g. AcmeWEX) Auto-approve Click Auto from the dropdown Send notifications when driver connects No Web only No Custom Terms and Conditions Disabled - Click Save
- The invite drivers screen will pop up

- Copy the code at the end of the link (not the QR code)
- Navigate to WEX Online and log in
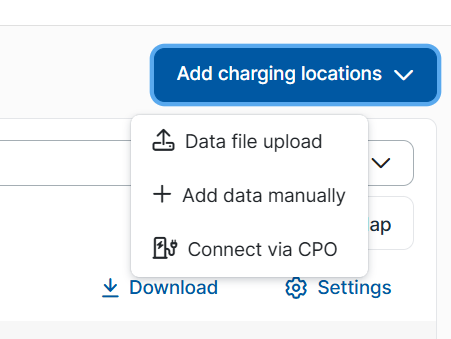
- Click the EV tab
- Click Add chargers button
- From the Add chargers dropdown list, click Connect via CPO
- Paste the copied link into the connection code box
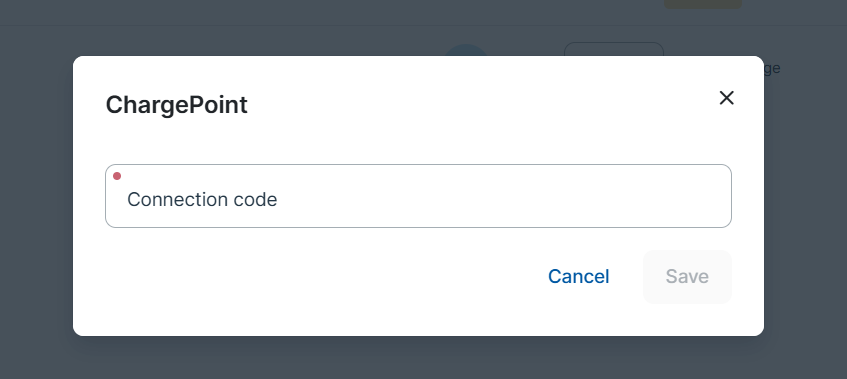
- Click Save
- Return to the ChargePoint interface
- Click the Stations tab
- Click on the Access Control sub-tab
- Click Create Access Policy

- Input information in all required fields as follows in the table below
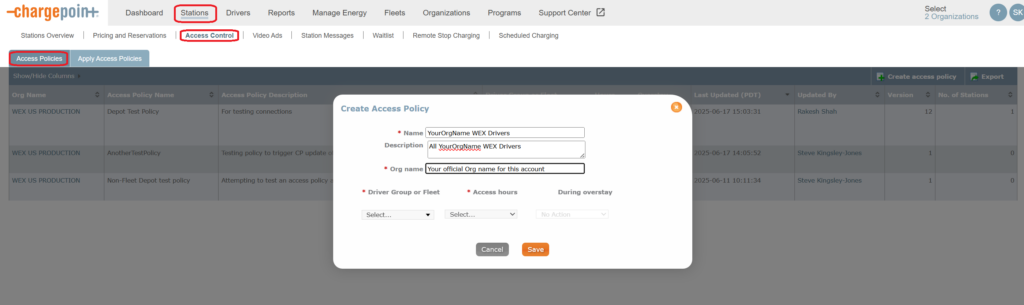
Field Input Name YourOrgName WEX Drivers (e.g. Acme WEX Drivers) Description All YourOrgName WEX Drivers (e.g. All Acme WEX Drivers) Org name The official name of your organization as entered into ChargePoint – should autofill after the first letter (as entered in section 3.1., step 5) Driver Group or Fleet Click the dropdown and select the group just created Access hours Set to site owner’s preference
Retrieve Your Existing ChargePoint Connection Code
- Log into your ChargePoint admin account
- From the Dashboard, click the Drivers tab
- Click the Connections sub-tab
- Click Invite Drivers
- Click Copy link and send to drivers
Chargie
Please contact Chargie and ask that your private depot chargers be enabled for WEX use.
Manual Single Charger Integration
Manual integration is possible with any CPO, however, chargers added manually can only be used for mapping purposes. Charge Detail Records (CDRs), charging session information, etc., will not be collected from manually-integrated chargers.
Fleet managers can manually add one or multiple depot sites at a time.
- Navigate to WEX Online and log in
- Click the EV tab
- Click the Add chargers button
- From the Add chargers dropdown list, click Manual entry
- Input information in all required fields
- Click Save
- Repeat steps 1-6 as needed
Manual Multiple Charger Integration
Manual integration is possible with any CPO, however, chargers added manually can only be used for mapping purposes. Charge Detail Records (CDRs), charging session information, etc., will not be collected from manually-integrated chargers.
- Navigate to WEX Online and log in
- Click the EV tab
- Click the File upload button
- Input information in all required fields
- Click Continue
- Click Download template
- Open downloaded template
- Note: If you are not the WEX Online administrator, please send this file to the correct person
- Follow the instructions noted in the template and save your file
- When your file is ready to import, click Upload
- Note: If your file has formatting errors, click Show errors to review and edit. When ready, click Upload again
- Click Save
Manage Charger Display in WEXOnline and DriverDash
Charger Visibility
- Log into WEX Online
- Click the EV tab in the navigation pane on the left
- Click Depot locations
- Find the charger that needs updating
- Click the 3 dot icon on the right side of the selected charger
- Click Manage visibility
- Click the Visibility dropdown and click your preferred setting
- Public: visible to all DriverDash users
- Private: visible only to DriverDash users linked to your organization
- Hidden: visible only to fleet managers in your organization – recommended for chargers undergoing maintenance or that are temporarily out of operation
- Click Save
- Repeat steps 2-8 as needed
Edit Chargers
- Log into WEX Online
- Click the EV tab in the navigation pane on the left
- Click Depot locations
- Find the charger that needs editing
- Click the 3 dot icon on the right side of the selected charger
- Click Edit
- Make any necessary changes
- Click Save
- Repeat steps 3-8 as needed
Remove Chargers
- Log into WEX Online
- Click the EV tab in the navigation pane on the left
- Click to select one or more chargers
- Click the 3 dot icon on the right side of the selected chargers
- Click Remove
- Click Remove
- Note: this action cannot be undone. This charger may be added again later
- Repeat steps 3-6 as needed